Sunday, February 26, 2012

Making a couple of tools

Well I've been sick for a couple of weeks so I haven't made any progress on the lute.  I hope to carve up the neck block over the next week so I can begin on the body soon after.  In the mean time I've worked on putting together a couple of the tools I'll need for the next steps.  I figured I'd post some pics of these home made tools for anyone curious.

First, some sort of holding device for the mold makes working much more convenient so a universal joint that allows it to be positioned at any angle was constructed.  The plans for creating this are part of the kit obtained at the website listed in the initial post.


DISCLAIMER:  If you aren't comfortable or knowledgeable about working with electricity do not attempt this but instead buy an already assembled bending iron.

For bending the ribs to conform to the shape of the mold a bending iron is needed to get the wood hot enough to break down.  I built this from an electric charcoal starter with the element squashed down enough to fit inside of a 2" steel pipe very tightly.  I then mounted this onto a fence post with spacers so the pipe wasn't resting on the wood.  I added a sliding dimmer switch so I could control the temperature and that's it.  This thing takes a long time to cool off after use so be careful to give plenty of cool off time before handling.

Friday, February 10, 2012

An eagerly awaited delivery.

I'm all grins :) ... the rosewood for the back of the lute came today!  Gotta get busy planing these down smooth.  They are rough cut at 4mm thick and need to be smoothed down to just under 2mm.  Then I can trace the patterns on and cut them out!


Wednesday, February 8, 2012

Completing the mold.

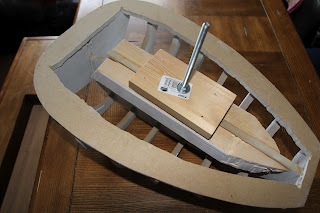
So the mold is now complete.


I've smoothed the rounded end to where I believe it is sufficient to support the shaping of the instrument body.


I painted it white and remarked the facet corners.  Tonight I will cover it in wax to prevent the ribs of the instrument from sticking to the mold when glued.  The block screwed on the bottom with the protruding bolt will be used to set the mold into a universal joint to hold it where needed as the lute is worked on.


The two holes in the end is where the neck block will be attached.  This is the next step of the project and I'll hopefully begin that this weekend.

Monday, February 6, 2012

Assembling the mold

I've used hide glue from Bjorn Industries (http://www.bjorn.net/prod.htm) to assemble the mold.  This glue comes in dry form as little granules.  You basically mix one part granules to one part water and let it soak for 30 minutes, then heat in a double boiler until the glue reaches NO MORE than 140F.  Anymore than that it will destroy the glue.  After cooking the glue it can be placed in the refrigerator for several weeks and re-heated as necessary.  This glue cleans up easily with water but ones dry the hold is permanent.  I'm sure the pieces would break somewhere other than the glued joints.

So we begin with all the pieces laid out before us. 


First we attach some support pieces to the spine that will later be used to mount the whole mold on a home made universal joint during lute construction.  Then glue the spine and end pieces to the base.

 The shot above shows the end where the instruments neck block will be attached.  This is the first piece of the actual instrument to be worked on and will be chiseled to follow the contour of the spine.

 Notice the end pieces on the two shots above.  Those will be chiseled by hand to match the curve of the spine on each end. 

UPDATE:  A couple of things I learned during this step. 
  1.  I glued the 3 end pieces above together and then glued them onto the base & spine.  This was a mistake as any misalignment of the 3 pieces will cause things to not line up well along the spine/base.  Glue them onto the base/spine assembly one at a time to ensure good alignment.
  2.  Make sure the glue is 140F while gluing!!  The glue temperature had dropped a bit and one of the ribs did not glue well and came off during my chiseling later.


Then we begin adding all the supporting ribs until we end up with....

Notice the ends have now been chiseled to match the curve of the spine.  I need to pay a bit more attention to this piece and make sure the 3 end pieces curve nicely while still maintaining the faceted edges the ribs will lay down on.  Getting close!


Preparing mold pieces for assembly

Ok, I've already traced the patterns for the mold onto the MDF board used to build the mold.  I've begun to cut the pieces out on the band saw.  Note the pieces are cut as close to the line as possible but not ON the line!  They will be trimmed down later with a sanding block to the correct size.

Continuing on I finished cutting out all necessary pieces for the mold.  Note the pieces that appear pie shaped do not have curved outer edges but are actually faceted, i.e. a series of straight lines onto which the ribs that make up the back of the lute will be laid.

That's it for tracing and cutting out the mold.  Next post we'll begin assembling the mold. 

Inspiration

While I was browsing YouTube watching classical pieces I noticed several performers playing lutes from different eras.  These instruments allow us to play pieces as the composers intended them to be played.  I was inspired to begin a new journey, learn to play a Baroque 13-course lute.  These seem to only be available as handmade instruments with a pretty high price tag.  I stumbled on a how-to course available from a British gentleman, David Van Edwards (http://www.vanedwards.co.uk) that details the building of a 13-course lute and decided to give it a try.  I've set up this blog to have a place to document my experiences with this project.

I've never been a wood worker at all, but I've never had the tools to do it right either.  The list of tools required to do this project correctly is actually quite small.  One can purchase these and the materials for the instrument at a fraction of the cost of purchasing a lute outright.

So I got the course in mid-January 2012 and began the initial steps of making the mould.  Hopefully this blog can be of help or inspiration to someone else contemplating the same goals as me.

I'll try to post frequently and include pictures of the process as I go.  If all goes well in the end, I just may try to build a classical guitar next!